Before making dynamic IP to static IP, first we need to understand the difference between these two and why it is necessary to have a static IP?
Dynamic IP Vs Static IP
When you have a static IP address, it means your IP address will be same forever. When you start your computer, it immediately knows your address. Your address will remain same.
But if you have dynamic IP, means your IP address will not be same. It will always change when you connect or disconnect your modem from the internet.
For Example: If you have a data card and you are connected with internet then just open the website whatismyip.com and check your current IP address. Now disconnect your data card and reconnect it with internet and check your IP again, it will change from previous IP. Your IP will never remain same.
Why it is necessary to have a static IP address?
Suppose you want to setup your own web server, ftp server and want to connect remotely to your computer then you need a static IP address.
You can get all above features without giving extra cost for a static IP.
There are many service providers who provide Dynamic DNS service to get this job done in just few simple steps. We are using NOIP service as an example.
This is absolutely free and will provide a static hostname from NOIP.
Step-1: First register for an account with NOIP (http://www.noip.com/select-account-type.php).
Here you will get 3 free host names with URL and Port 80 Redirects.
Step-2: Fill the form with username, password, email and the most important hostname like myhostname.no-ip.biz details.
Step-3: Now click on Sign Up button and you will get a confirmation e-mail from NOIP. Just click on it to activate the link.
Under “My Services” tab, select “Dynamic DNS” on the left side bar
Step-3: Next step is to download Dynamic Update Client for Windows from following link.
http://www.noip.com/downloads.php?page=win
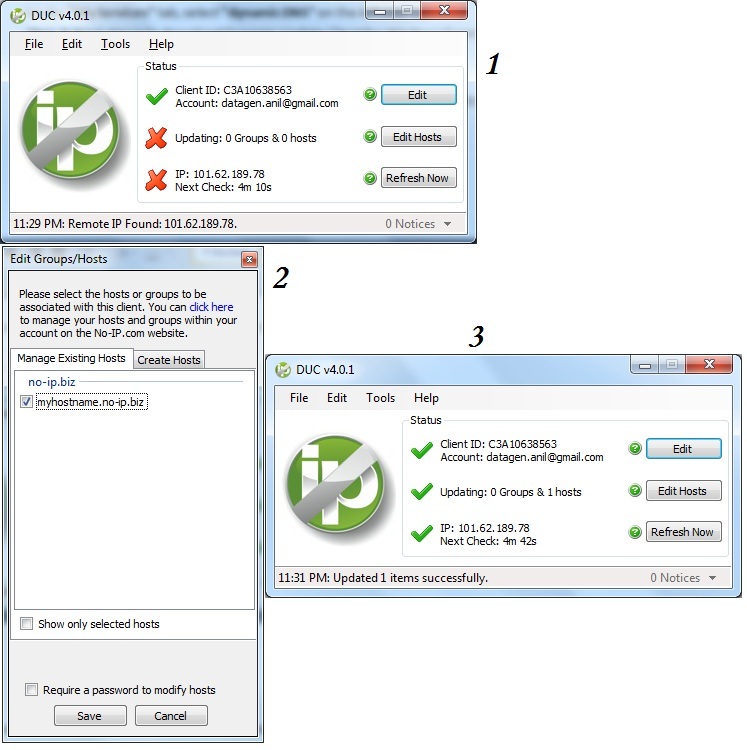
Step-4: After downloading DUCSetup_v4_0_1.exe from above link. Install the client software in your computer.
Step-5: When you run the application, it will ask your e-mail id and password to validate your account and settings.
Step-6: Click on “Edit Hosts”, select your hostname and click on save button to save all the settings.
Step-7: Your configuration is complete now you can access your hostname.
You can also manage your hosts under “Manage Hosts” option on the left side bar.
The client application will automatically update your changed IP address to the NOIP server. You have to just run this application while using NOIP hostname.
